A short while ago we started Movie Night at the MooreBabies household. It is typically Saturday, unless we are otherwise engaged (such as this past Saturday was the Easter Egg Hunt at the baseball game)... so we had Movie Night on Friday.
Well THIS past week I decided to FINALLY make my own pizza. Yeah, I'm actually embarrassed to say that I (lover of pizza that I am) have never made pizza at my house. I ran to Publix and got myself some pizza dough from their bakery (tiny steps... I'll make my own pizza dough... eventually), mozzarella cheese, and pepperoni. I decided to make my own pizza sauce. I didn't do much research since this was kind of last minute, and I used the following recipe:
Easy Pizza Sauce 1
I was hesitant but it got 5.5. stars...
Ingredients
1 (6 ounce) can tomato paste
1 1/2 cups water
1/3 cup extra virgin olive oil
2 cloves garlic, minced
salt to taste
ground black pepper to taste
1/2 tablespoon dried oregano
1/2 tablespoon dried basil
1/2 teaspoon dried rosemary, crushed
* I added some (1.5t) sugar as a few comments suggested
Directions
1.Mix together the tomato paste, water, and olive oil. Mix well. Add garlic, salt and pepper to taste, oregano, basil, and rosemary. Mix well and let stand several hours to let flavors blend. No cooking necessary, just spread on dough.
So now, Movie Night has turned into Pizza & Movie Night! Although I don't think we are going to make a FULL pizza each time. The dough instruction label said that it could be frozen, so I think we'll just use half or a third of the dough.
Another reason to use half or third of the dough is because I didn't get the dough thin enough on the edges, according to hubby we need to learn how to toss pizza dough (yeah, I'll let you know how THAT turns out).
For next time, (if I use this same recipe) I will use a little less oil and rosemary. The rosemary was REALLY strong to me.
Also, maybe different cheese... I bought the Kraft packaged shredded mozzarella cheese.
I am NOW on a quest for the BEST pizza recipe.
So do you guys have any good pizza recipes that you use? Sauce, dough (when I get there), topping combos! Let me know, I'd LOVE to try them out.
Friday, April 29, 2011
Tuesday, April 26, 2011
Versatile Blogger Award & 7 MORE things...
The reason I say 7 MORE things is because I listed 7 things for my Stylish Blogger Award...
Wooo hoooo! I have been given the Versatile Blogger award... score :) Alright, here are the rules!
1. Thank the person who gave you the award and link back to them.
Amy over at Sitting at our Kitchen Table, thank you so much.... you ROCK!
She has some sweet recipes (the Red lobster biscuits are to die for), fun Holiday projects, and cute kids crafts that I can't wait to try out with my little ones when they get a little older. Definitely go check her out.
2. Tell seven (more) things about yourself.(seriously... are you guys that interested?)
Go check out these fabulous blogs!!
Wooo hoooo! I have been given the Versatile Blogger award... score :) Alright, here are the rules!
1. Thank the person who gave you the award and link back to them.
Amy over at Sitting at our Kitchen Table, thank you so much.... you ROCK!
She has some sweet recipes (the Red lobster biscuits are to die for), fun Holiday projects, and cute kids crafts that I can't wait to try out with my little ones when they get a little older. Definitely go check her out.
2. Tell seven (more) things about yourself.(seriously... are you guys that interested?)
- I'm a lefty... in fact, I'm like the only lefty on either side of the family as far as people can remember!
- I
liketry to work out 4 times a week. The only reason I do this is because I'm trying to 'get that body back (I) had at 17', Trace Adkins. Funny story... well more so annoying.... anyway, my ipod ran out of battery today in the gym, and as I'm working out the only part of a song that replays in my head is "she wants that body back, she had at 17..... she wants that body back she had at 17" - I used to hide bowls of jello under my bed (and we know what happens to old jello) as well as clothes, etc when I was younger... yet now I can't stand clutter and I work my best to be clean and organized.
- I was on a Junior Olympics gymnastics team when I was young.
- I'm a (nerdy) jock -- when I was a kid, I played soccer, softball, (did) gymnastics, golf, swim team, tennis, basketball.. oh and piano and I was in chorus -- In High School, I did soccer, softball, swim team, and track (and chorus). I narrowed it down to intramurals (and chorus) for college (hey... a girls gotta have fun, right?)
- I'm slightly afraid of the ocean (undertow, sharks, and jelly fish, ya know), but love the lake.
- My pointer toe is longer than my big toe.
Go check out these fabulous blogs!!
- Shannon @ Enjoy Life & Love
- Emily @ La Force be with You
- Tasha @ {Dot}{Dot}{Dot}
- Gwen @ Vintage Gwen
- Meredith @ The View from Up Here
- Lindsey @ The B Family
- Jessica @ Sand Dune Lane
- Ashlee @ Pretty in Pink and Orange Too
- Nicolette @ Momnivore's Dilemma
- Kim @ Little Rays of Sunshine
- Ashley @ Family of Savages
- Michelle @ Crafts and Crap
- Trina @ A Love 2 Create
- Rissa @ Hazel and Honeysuckle
- Wendy @ Madras n Pearls
Monday, April 25, 2011
My Worst fear...
Ok... so that may be a little dramatic... ok, let me rephrase that.
My worst fear, in regards to embroidering for money, came true. Blech.
Up until now, the embroidery I have done has been for gifts... my theory is that if someone gets it for free as a gift, they can't complain about it, am I right? I'm right.
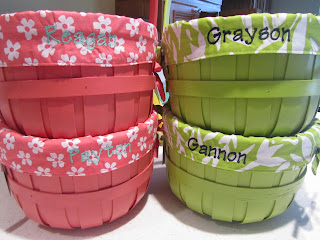
Just the other day, one of my fellow Junior Leaguers sent me a message saying she remembered (from facebook) that I have an embroidery machine and would I be able to embroider Easter basket liners for her daughters... she'd pay me. I said, sure... let me check out the liners to make sure I can physically do it. Everything looks good and she gives me a check and I take the liners.
I set up the names and head over to my mother-in-laws to embroider. After about an hour... voila! 2 personalized Easter basket liners. Completed.
I get home and see a message from another fellow Junior Leaguer and best friend of first Junior Leaguer. In short she heard that I had done the Easter baskets and could I please please please please do some for her kids. No problem! I get the baskets from her, set up the names and get ready for embroidering.
I was pretty hesitant about picking the embroidery color because these liners (from Target) are kinda BRIGHT pink and white (huge contrast there) for the girls, and a olive green and white for the boys. So I choose a navy blue for the guys and I try a teal green for the girls. Pink and teal looks good together, right? Not. in. this. case.
So I embroidered the girls baskets and .... oh no! I really can't see the names. What am I going to do? I have already unhooped them and don't have the skill to rehoop them... oh boy. Plus, these baskets are $12, do I go buy new ones and eat the cost?!
I rush off to my embroidery store and talk to "my" lady. After checking out my options I decide that I can use a fabric pen to darken the name. I embroidered myself a "Tester" piece of fabric and get started with the pen.
I used green ("P" and half of "Y") and purple (half of "a" and "t"). The purple seemed to bleed to me, although I could have just goofed on the "a", but I decided to go with the green.
After a few coats I decide it's lookingpretty good better and the end result is a happy customer!
Phew... crisis averted (although, like she said after I explained what I had to do was... they were only Easter baskets -- no sweat!)
My worst fear, in regards to embroidering for money, came true. Blech.
Up until now, the embroidery I have done has been for gifts... my theory is that if someone gets it for free as a gift, they can't complain about it, am I right? I'm right.
Just the other day, one of my fellow Junior Leaguers sent me a message saying she remembered (from facebook) that I have an embroidery machine and would I be able to embroider Easter basket liners for her daughters... she'd pay me. I said, sure... let me check out the liners to make sure I can physically do it. Everything looks good and she gives me a check and I take the liners.
I set up the names and head over to my mother-in-laws to embroider. After about an hour... voila! 2 personalized Easter basket liners. Completed.
I get home and see a message from another fellow Junior Leaguer and best friend of first Junior Leaguer. In short she heard that I had done the Easter baskets and could I please please please please do some for her kids. No problem! I get the baskets from her, set up the names and get ready for embroidering.
I was pretty hesitant about picking the embroidery color because these liners (from Target) are kinda BRIGHT pink and white (huge contrast there) for the girls, and a olive green and white for the boys. So I choose a navy blue for the guys and I try a teal green for the girls. Pink and teal looks good together, right? Not. in. this. case.
So I embroidered the girls baskets and .... oh no! I really can't see the names. What am I going to do? I have already unhooped them and don't have the skill to rehoop them... oh boy. Plus, these baskets are $12, do I go buy new ones and eat the cost?!
I rush off to my embroidery store and talk to "my" lady. After checking out my options I decide that I can use a fabric pen to darken the name. I embroidered myself a "Tester" piece of fabric and get started with the pen.
I used green ("P" and half of "Y") and purple (half of "a" and "t"). The purple seemed to bleed to me, although I could have just goofed on the "a", but I decided to go with the green.
Tester fabric |
After a few coats I decide it's looking
Trust me... it WAS darker |
Sunday, April 24, 2011
Happy Easter (recap)!
Phew! I for one am kind of glad that Easter is over, well maybe not exactly Easter, but this past week. Sheesh! But we sure had fun.
Let's start with the decorations -- I only have a few things and didn't make any Easter decorations, so this is kinda boring! Just a Joann front door sign, Annalee dolls (thanks to my brother), an Easter tree (thanks mom), and some other odds and ends.
In the crafting department - I made the girls appliqued bunny shirts!! I "borrowed" the design from a free printable I saw floating around (forgive me, I forget where it is from)
I made some Easter cards for the girls to give out to her little buddies
I was commissioned to embroider Easter basket liners for some Junior League friends' kids (more on that later).
Lastly, I made a ribbon & pearl necklace and bracelet set for one of my friends daughters to put in her Easter basket.
Our Easter celebration started last week with my neighborhood Easter Egg Hunt (which Charlotte LOVED). I made some treats and we had a blast.
We dyed eggs.
The night before Easter we went to a Minor League baseball game which had an Easter Egg hunt on the outfield beforehand (poorly planned, but still cute)
ON Easter, we got up and did the Easter baskets, made pancakes (hubby used Baking Soda instead of baking powder.... not the same thing. haha), got ready for church and did photo shoot #1, church, lunch with the in-laws, home for an Easter egg hunt and photo shoot #2, and LASTLY, the girls got a HUGE (maybe a little too big) gift from Mimi and Grandpa for Easter... the Pottery Barn Kitchen.
PHEW, what aday week!
Let's start with the decorations -- I only have a few things and didn't make any Easter decorations, so this is kinda boring! Just a Joann front door sign, Annalee dolls (thanks to my brother), an Easter tree (thanks mom), and some other odds and ends.
In the crafting department - I made the girls appliqued bunny shirts!! I "borrowed" the design from a free printable I saw floating around (forgive me, I forget where it is from)
I made some Easter cards for the girls to give out to her little buddies
I was commissioned to embroider Easter basket liners for some Junior League friends' kids (more on that later).
Lastly, I made a ribbon & pearl necklace and bracelet set for one of my friends daughters to put in her Easter basket.
Our Easter celebration started last week with my neighborhood Easter Egg Hunt (which Charlotte LOVED). I made some treats and we had a blast.
We dyed eggs.
The night before Easter we went to a Minor League baseball game which had an Easter Egg hunt on the outfield beforehand (poorly planned, but still cute)
ON Easter, we got up and did the Easter baskets, made pancakes (hubby used Baking Soda instead of baking powder.... not the same thing. haha), got ready for church and did photo shoot #1, church, lunch with the in-laws, home for an Easter egg hunt and photo shoot #2, and LASTLY, the girls got a HUGE (maybe a little too big) gift from Mimi and Grandpa for Easter... the Pottery Barn Kitchen.
(Thanks Shannon for reminding me...) Does this yellow dress look familiar? Well this just happens to be the Shabby Apple dress that I won back in March! I decided Easter would be their perfect debut for it. Especially since I dressed the entire family up in yellow!!
PHEW, what a
Friday, April 22, 2011
Baby Leggings from Socks... FINALLY!
I have had this pile of argyl and solid colored knee high socks for, like... 5 years... or more! It's not like I wear them regularly, but I have in the past, worn them:
This was bachelorette party that I hosted for one of my best friends at my house... I gave her a HUGE list of items of clothing to bring and then I told her we would put her outfit together with what she brought (HUGE hit, by the way because she brought clothes that looked cute on her). I took the theme from The Wedding Date and did a golf attire theme. So here is me with the bachelorette:
And here are some ladies on stage (the faces have been blurred to protect the... guilty -- not me... I was pregnant at the time... what timing huh?)
Also, some of our friends here throw a Masters Party every year... so they are perfect for that.
But other than those select events, these socks just don't get much use, ya know what I mean?
However,I just could not get rid of them because a few years ago I saw a How-To on making knee high socks into baby leggings. Ever since that day (like 2 years ago) I have held onto these socks saying that I would make them one day. Well that one day FINALLY came!
Now, this isn't going to be a real tutorial because there are some out there, like here, here, or here.
But here are some quick steps that I took.
1. Get knee high socks, scissors, and thread (or sewing machine... "my" sewing machine is 20 min away at my mother in laws).
2. Cut at the ankle, after the heel, and before the toe.
3. Discard the heel and toe.
4. Fold over what used to be the part under your foot (right side out -- seam on the inside)
5. Put folded "foot" piece around the cut ankle part and line up all 4* edges.
* 2 from the folded over "foot" piece, 2 from the cut ankle part.
6. Open it up and you will have 3 edges that you need to pin around -- 1 from the cut ankle part, and 2 from the folded over foot part. Ok, that sounds much more difficult than it really is. Maybe I am not explaining it right... hope the picture helps.
7. Machine or hand stitch around your top - sewing together 3 sides all around the sock... are you with me here?
8. Once you are done... "unfold" your "foot" part and you end up with...
The sewn part is at the top of the picture and the grey part is what used to go around your calf.
Looks like my new few nights of movie watching are going to be busy...
Looking back, I should have kind of measured my little(st) ones legs before sewing because these are kinda, sorta long on her and after 10 minutes of her wiggling, rolling, and scooting on the ground they are at her ankles.
Oh well, you live and learn.
Charlotte let me put them on her for last nights walk -- which works out well because this child falls down just about every night while running!
Linking up: Making the World Cuter, Keeping it Simple, Marvelously Messy, The Girl Creative, CRAFT, Creating my way to success, hazel and honeysuckle, {Dot}{Dot}{Dot}, Vintage Wanna Bee, Not Just a Housewife, A Bowl Full of Lemons, The blackberry vine, Sweet Peas and BB, Someday Crafts, Women Who Do it All, momnivores dilemma, Sun Scholars
Thursday, April 21, 2011
I disclose...
Apparently, bloggers are supposed to have disclosure statements... who knew? So I ran over to http://www.disclosurepolicy.org/ and got started with mine. As you can tell... I tweaked it a bit. Here goes:
This blog is a personal blog written and edited by me. This blog was created so I could share my thoughts, product reviews, recipes, and tobrag about share all the fun crafty things I've done. However, since I have joined the blogging community I have found that I am seriously lacking in the craftiness arena, so I am now here to get ideas for my craftiness and show other bloggers that if I can do it, heck... anyone can do it. For questions about this blog, please contact Stevie @ themoorebabies(at)gmail(dot)com.
This blog would accept forms of cash advertising, sponsorship, paid insertions or other forms of compensation if anyone was offering! If you ARE interested, contact Stevie @ themoorebabies(at)gmail(dot)com.
The compensation received will never influence the content, topics or posts made in this blog. If I like a product, I will let you know. If don't like a product, I will share that as well.
I am not compensated to provide opinion on products, services, websites and various other topics. The views and opinions expressed on this blog are purely mine. Any product claim, statistic, quote or other representation about a product or service should be verified with the manufacturer or provider. You may have different experiences than I do.
There you have it... my disclaimer.
This blog is a personal blog written and edited by me. This blog was created so I could share my thoughts, product reviews, recipes, and to
This blog would accept forms of cash advertising, sponsorship, paid insertions or other forms of compensation if anyone was offering! If you ARE interested, contact Stevie @ themoorebabies(at)gmail(dot)com.
The compensation received will never influence the content, topics or posts made in this blog. If I like a product, I will let you know. If don't like a product, I will share that as well.
I am not compensated to provide opinion on products, services, websites and various other topics. The views and opinions expressed on this blog are purely mine. Any product claim, statistic, quote or other representation about a product or service should be verified with the manufacturer or provider. You may have different experiences than I do.
There you have it... my disclaimer.
Wednesday, April 20, 2011
Tilapia with Spinach & Tomatoes
1/2 t oregano
1 t onion powder
1 t minced garlic
3 T, separated olive oil
Fresh washed spinach with stems removed
tomatoes (I used plum) sliced thinly
scallions or onion finely diced
Parmesan cheese
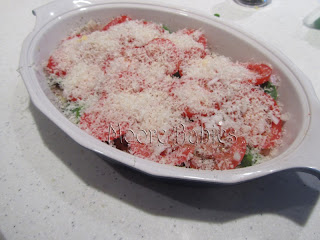
2. Sprinkle the tilapia with the salt, pepper, basil, oregano, onion powder, garlic and 2T of the olive oil
Linking up: Someday Crafts, Handy Man Crafty Woman, House of Hepworths, Momnivores Dilemma, Gluesticks, It's a Keeper Thursday, Sweet Peas and Bumblebees, Remodelaholic, Fingerprints on the Fridge, Sarahndipities, Making the World Cuter, Keeping it Simple, Marvelously Messy, Creating my Way to Success, hazel and honeysuckle, {Dot}{Dot}{Dot}, Vintage Wanna Bee, Not Just a Housewife, A Bowl Full of Lemons, The Blackberry Vine, Sweet Peas and Bumblebees
This is by FAR one of the best Tilapia recipes that I have tried; the tomatoes add this wonderful sweet and juicy-ness to the Tilapia and the lemon drizzled on top after the baking is superb!! Best of all, it is SUPER easy to put together.
This recipe is definitely a keeper!
Ingredients
Tilapia (I used 3 filets, but should have used 4 for the 2.5 of us)
1/2 t pepper
1/2 t salt
1 t basil1/2 t oregano
1 t onion powder
1 t minced garlic
3 T, separated olive oil
Fresh washed spinach with stems removed
tomatoes (I used plum) sliced thinly
scallions or onion finely diced
Parmesan cheese
Lemon juice
Instructions
1. Grease a baking dish and arrange tilapia in one layer on bottom
2. Sprinkle the tilapia with the salt, pepper, basil, oregano, onion powder, garlic and 2T of the olive oil
3. Layer the spinach, onion, and tomato slices on top.
4. Drizzle with 1T more of the olive oil
5. Sprinkle (or coat... I like cheese) with the fresh Parmesan cheese.
6. Bake at 400* for 20-25 minutes
7. Remove from oven and drizzle with some lemon juice (I used a bottle of lemon juice and just drizzled over tilapia... maybe 1T worth.
8. Enjoy
Linking up: Someday Crafts, Handy Man Crafty Woman, House of Hepworths, Momnivores Dilemma, Gluesticks, It's a Keeper Thursday, Sweet Peas and Bumblebees, Remodelaholic, Fingerprints on the Fridge, Sarahndipities, Making the World Cuter, Keeping it Simple, Marvelously Messy, Creating my Way to Success, hazel and honeysuckle, {Dot}{Dot}{Dot}, Vintage Wanna Bee, Not Just a Housewife, A Bowl Full of Lemons, The Blackberry Vine, Sweet Peas and Bumblebees
Friday, April 15, 2011
30 day - Recap!
Hubby is due home TONIGHT and I'm SURE all of my faithful followers are waiting with bated breath to hear how I did on my "Loft Goals for the Month" post...
Well here you go:
Project #1: Print out 5 pictures to make month-by-month frame up-to-date - Completed.
Project #2: Get at least another 2 books completed and ready to order - I ordered 2 books and 1 waiting on my Picaboo "bookshelf". - Completed
Project #3: Organize the (kids) sock drawers.
Now let me just show you...
Before
So I took them ALL out... I almost gave up, threw these away and started from scratch...
After... ta da!
AND for my lonely socks... I stick them in this cute box on top of my daughters jewelry box until it's buddy can be found. (PS - That is NOT my daughter in the picture... I've had that box 6 months and STILL haven't put in a picture... sheesh)
Completed.
* A fellow blogger, Shalah, suggested I use lingerie bags for washing socks. I actually WAS doing this (although you wouldn't guess it from my pictures) But she used multiple bags. My problem was my bag was always in the was or waiting to be put away when I'd need somewhere to put socks, so I'd just throw them in the hamper... well I got another one! Now I have 2 lingerie bags for my socks. Let's hope I can keep track of them :)
Project #4: Embroidery. Completed: birthdays; showers will be posted once recipients have gotten their gifts.
And here are the ones I completed for a baby shower today:
Project #5: Make a tutu. Completed (actually I made 3)... tutorial here
Project #7: Make a fabric rosette. Completed; apron here
Project #8: I hope to knock off some more of my "to Attempt" list (which, by the way I lost most of... AHHH. Technology is NOT my friend today)
Pom poms
Ribbon & Pearl Necklace
Baby Leggings - not posted yet, but completed
I kind of like making a list for myself... it sort of gives me some accountability. (not that you guys REALLY care... but still).
Now that the hubs is home... I'm going to have less time for crafts (and more quality family/hubby time)... but I think I'm going to put 1-2 crafty items on my list that Ihave to would really like to complete that month.
Now to decide what to do... oh the pressure! Any suggestions?
Well here you go:
Project #1: Print out 5 pictures to make month-by-month frame up-to-date - Completed.
Project #2: Get at least another 2 books completed and ready to order - I ordered 2 books and 1 waiting on my Picaboo "bookshelf". - Completed
Project #3: Organize the (kids) sock drawers.
Now let me just show you...
Before
So I took them ALL out... I almost gave up, threw these away and started from scratch...
After... ta da!
AND for my lonely socks... I stick them in this cute box on top of my daughters jewelry box until it's buddy can be found. (PS - That is NOT my daughter in the picture... I've had that box 6 months and STILL haven't put in a picture... sheesh)
Completed.
* A fellow blogger, Shalah, suggested I use lingerie bags for washing socks. I actually WAS doing this (although you wouldn't guess it from my pictures) But she used multiple bags. My problem was my bag was always in the was or waiting to be put away when I'd need somewhere to put socks, so I'd just throw them in the hamper... well I got another one! Now I have 2 lingerie bags for my socks. Let's hope I can keep track of them :)
Project #4: Embroidery. Completed: birthdays; showers will be posted once recipients have gotten their gifts.
And here are the ones I completed for a baby shower today:
Project #5: Make a tutu. Completed (actually I made 3)... tutorial here
Project #7: Make a fabric rosette. Completed; apron here
Project #8: I hope to knock off some more of my "to Attempt" list (which, by the way I lost most of... AHHH. Technology is NOT my friend today)
Pom poms
Ribbon & Pearl Necklace
Baby Leggings - not posted yet, but completed
I kind of like making a list for myself... it sort of gives me some accountability. (not that you guys REALLY care... but still).
Now that the hubs is home... I'm going to have less time for crafts (and more quality family/hubby time)... but I think I'm going to put 1-2 crafty items on my list that I
Now to decide what to do... oh the pressure! Any suggestions?
Subscribe to:
Posts (Atom)