Showing posts with label decorating. Show all posts

Tuesday, December 17, 2013

Decorating the Tree

I know I've written on Christmas tree decorating before, but I just love doing it. Granted, it took me a little longer in the season to complete the decorating of our tree... but still... we are done (finally!)

I love decorating primarily because of the ornaments; they bring back memories of people, places, events, and more and countless times during the decorating process a smile is brought to my face simply from an ornament.

Our first Christmas | First Christmas Church
        Our year with Disney passes | My grandma's handpainted ornaments
Our trip to the Keys | Clemson Tigers, of course!
Baby's 1st Christmas | Our Canada Babymoon     


In our new house I am finally able to put our tree in front of a front facing window so that it can be seen from the outdoors (like ours was growing up!). I do have a bit of advice for other "front facing window tree putter-uppers"... if your tree is seen from the road, actually decorate the back of your tree.
Case in point, the girls and I were on a walk the other day to see the lights and we came across one such example: The lights on the tree were on, they just didn't go all the way around the tree so that I could see them. Such a waste of a "front facing window" tree location.
Photobucket

Saturday, November 2, 2013

Halloween Recap ::. 2013

This was my first year decorating in my new house (yay! so exciting!).  So here was year #1:


For the past 5 years we have been taking Halloween pictures with the same few families. It started with 5 kids, but we've multiplied and the same 5 families now have 10 kids. Here are my girls in those shoots:

Lastly... this was the FIRST Halloween in our new neighborhood. and Oh. My. Gosh. it was AWESOME! So many families milling around all night, it was great. We did a quick trip of the neighborhood (and the street across the way) and then came back to our house, laid out a blanket, make popcorn, and handed out candy to the rest of the "customers" (as the kids called the Trick or Treaters).

What a great night!


On a side note, I managed to buy so much discounted Halloween decor this year that I have graduated from 2 Halloween boxes to.. 3?... plus maybe some shelf space in the garage for the larger items? Sheesh!


Photobucket

Saturday, April 6, 2013

The "House Guest Book"

So, the other day I was stuck at the car dealership (with all 3 girls) getting the car serviced and I managed to flip through a few magazines (yes... I did say I was there with all 3 girls AND I read a magazine... miracle I know)... but that's besides the point, anyway, I was perusing my latest Southern Living and came across their "Secrets to Southern Charm" section and was immediately intrigued!

Now I'm a Jersey girl... nothing southern about that, right? BUT I spent 5 years at Clemson in South Carolina (totally Southern) and I've always considered myself to be a southern girl at heart so I jumped right in.

It was a very good list and I actually did some of them already (have a signature drink at parties) BUT one got me excited and I decided right then and there that I was going to do it. That was #203... "Revive the House Guest Book". I LOVE this idea! What a perfect way to remember visits both large and small; from playdates with one of two buddies to our annual Christmas Cocktail party. Genius. Really. And I knew exactly where to put it; my hubby's Great Uncles antique desk that sits in our front hall that hubby and my dad refinished.

Pretty, huh? ALSO, I was even MORE excited because I thought this was the perfect tradition to start with our new home since we just moved in. So off I ran to Target to look for the MooreBabies new house guest book... but I didn't quite find one that I wanted; the ones at Target were more practical than pretty enough to sit on a gorgeous antique desk.

So I ran to Barnes and Noble and SUCESS!

I did have to sort of back-fill since I just bought it and we've had people over already but I am super excited to have a record of all gatherings hosted at our house!

 
Linking up: Nifty Thrifty Things, DIY Showoff, Creating my way to success , CRAFT, Keeping it SImple , Under the Table Dreaming , A Bowl full of Lemons, Sweet Little Gals , Our Delightful Home , Chef in Training , Homework , Blackberry Vine ,  ,Not just a Housewife , Elizabeth & Co. , Romance on a Dime, DIY By design, Handy man Crafty Woman, Someday Crafts, Gingersnap Crafts, Dragonfly Designs, Trendy Treehouse, Sew Much Ado , My Girlish Whims, Vintage Gwen, Crafty Blog Stalker , Momnivores Dilemma , RaeGun's Ramblings , shaken together life, nap time crafter, Ladybird Ln, Bacon Time,
Photobucket

Saturday, March 17, 2012

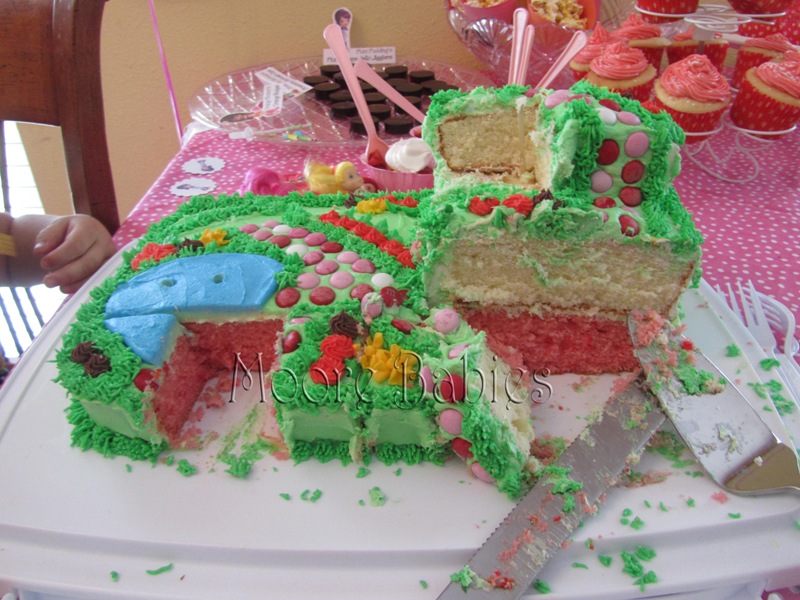
Strawberry Shortcake Birthday ::. The Cake

 In case you missed my guest post over at Between U & Me the other day... here it is!

Strawberry Shortcake Birthday Cake

Ok, I'm not gonna lie... I'm really proud of this cake.

Like, SUPER proud of this cake.

So much so, that I would like to share with you how I did it.

1. Start with a strawberry cake (boxed... which was FANTASTIC!!)

2. Put on a crumb coat using whatever icing you want. I used canned because I didn't feel like making half a dozen batches of icing. This was buttercream.

3. I baked a white 8"x8" cake (plus a dozen cupcakes) because I figured that not everyone would really like strawberry cake. Once cooled, I cut 1/3 off, then cut that 1/3 in half.
4. Put the 3rd layer on (secured with skewers... we should have leveled the cake, but we didn't) and crumb coat and chill.
5. NOW using my Grandma's Wedding Icing recipe, cover the whole cake in green.
6. Smooth the cake using step 4 on Wilton's site (or after googling, this method looks awesome). I also added the icing for the pond...

7. ... then smooth the pond out and added the pathway (PS I used valentine's m&ms)
8. Next came the grass using tip 33. And then I took a break because my hand got sore. Back to the fridge went the cake.

9. Finally, I added in some color with some flowers; I made drop flowers (yellow) with tip 18 I believe and I made rosettes with tip 16.

Now we are ready for PARTY DAY!
I almost couldn't cut into it...

but with 17 3 year olds hovering around begging for cake, I had to give in.

Linking up: Crafty Mom Share, Young & Crafty, Tatertots and Jello, Lolly Jane, Around Tuit, Under the Table Dreaming, Crafts Keep me Sane, CRAFT, The Girl Creative, Delicate Construction, Making the World Cuter, Homework, Not just a Housewife, A Bowl ful of Lemons, Chef in Training, Vintage Wanna Bee, Blackberry Vine, Gluesticks,  Our Delightful Home

Featured:
Our Delightful Home
Photobucket

Wednesday, January 11, 2012

{Party tip} Don't let guests hit their head on that light fixture

I don't know if you are like me or not, but when I have a party, I tend to move my furniture all around in order to give people as much room as possible to hang out. Primarily, we move our kitchen table to the wall between our two sets of french doors and we put all the food on it. This is all fine and dandy except we have a light fixture hanging above our table, and when the table is gone (and drinks are involved) people tend to whack their heads.

Case in point: Our 2nd Annual Cocktail Party.
Table is moved so there is space, BUT no one can stand there anyway because the light fixture is too low. Bad form!

2nd Annual Cocktail Party
Circa 2007
What you really want to should do is just temporarily raise the light fixture, right?


Well all you need is an "s-hook" found everywhere really for a dollar maybe; walmart, Home Depot, Lowes, heck... the grocery store probably carries them too.
S Hook
What you do is stand on a ladder (or sturdy chair if you don't feel like dragging one in from the garage) and attached one side of the hook to the loop right above the light fixture.
 Next, hook the other side of the S-hook to the top loop (or however high you want to go to get the fixture out of the way). Use your other hand to help lift the light fixture up in case, while you are struggling to lift the fixture up, it slips off. No, I'm not speaking from experience, but it could happen.

 And Voila! Your light fixture is out of the way.


See, even my tall friends were safe from whacking their heads!

Hope this tip helps you (and your party-goers)!

Linking up: Twin Dragonfly Designs, Blue Cricket Design, Sew Much Ado,
Rae Gun Ramblings, Handyman Crafty Woman, Vintage Gwen, Someday Crafts, Turtles Life for Me,  Momnivores Dilema, Gluesticks, It's a Keeper, Between U & Me, The Crafty Blog Stalker,  Crafty Mom Share , CRAFT, LadyBird Ln, Bacon time, Delicate Construction, Naptime crafters, Fingerprints on the Fridge

Featured:


Photobucket

Friday, December 23, 2011

Moore Babies {as decorated for Christmas}

** there are a lot of pictures; be forewarned **

Remember when I was starting to get my boxes down when I had about 12 bins plus random non-boxed items stacked up in my garage? WELL, I promised I share my Christmas Decorating.... so here goes nothing :)

Welcome to the MooreBabies house all lit up at night!
My lovely front door wreath that mom and I made 2 years ago.

Front entryway
(L) My Christmas card holder and Charlotte's hand print tree
(R) Advent calendar that mom made 20+ years ago... my FAVORITE thing to do when I was little!


Front hall "mantle"

(top L) Mistletoe of course
(bottom L) Kitchen table
(R) Decor above the kitchen table ... so cute!

Where the majority of my decorations live

(L) Various figurines and snowglobs
(TR) Hand painted plate, handpainted angels, hand painted pitcher, hand painted nativity (none painted by me)
(BR) Various Christmas nicknacks

THE VILLAGE (Dickens' Village)!!
I LOVE LOVE LOVE my village. One day I want a special table  set up, but with the horse of a dog and 2 little rugrats running around, behind closed doors is the best place to put it...
... because they sure love looking at it!!

A german smoker, several Annalee dolls, plus stuffed animals the girls can actually play with

(L) Santa, more Christmas nicknacks
(TR) Little People Nativity (when Charlotte first saw this she said "Baby Jesus is SOOO cute")
(BR) Christmas tree mom made me... LOVE IT!

The fireplace mantle

The REAL tree :)

This was the other night while watching a movie; LOVE!
 And LASTLY... lest the girls feel left out. Their very own Sesame Street (turned handmade ornament) tree!

There you have it...
Moore Babies as decorated for Christmas!!
Merry Christmas everyone.

Linking up: Between U $ Me, Bacontime, The Crafty Blog Stalker, Momnivores Dilema
Photobucket

Link within

Related Posts Plugin for WordPress, Blogger...