Showing posts with label Featured. Show all posts

Wednesday, November 7, 2012

Car Birthday - Crayon Favors

Back to the Car Birthday party series of posts...

The favors, which the party goers were told to "Take one for the road" were car crayons! These were a pinterest find inspired by Homemade By Jill.

I followed Jill's instructions to a T, and completed the favors a week ahead of time (go me!!).

I found that running a razor along the length of the crayon made the paper come off quite easily.

I then sorted the crayons by color.

Like Jill, I used a tin can setting in a pot of boiling water to melt my crayons while stirring with a wooden dowel.

I then used my pot holders and tongs to pour the wax from the super-duper hot tin can into the plastic car molds.

Once all the crayons were completed, I bagged and tagged them.

The favor bags say, "Thanks for Zooming By my 2nd birthday party! Love Jillie". Then on the back, per my moms suggestion, I wrote "Please enjoy some car crayons". According to mom, people would have confusion over what these were, I of course laughed it off, however... we did have one child eat part of the crayon (she spit it out though).

All my girlfriends were super impressed with the fact that I made the favors; so easy!!


Linking up: Peas and crayons  , Dragonfly Designs ,  Handyman Crafty Woman , Sew Much Ado , Someday Crafts , Between U & Me  ,Trendy TreehouseVintage GwenMomnivores DilemmaLive Laugh Rowe , Crafty Blog Stalker , Happy Go Lucky ,  ladyBird Ln
Lamb around  , Young and Crafty , Crafty Moms Share , CRAFT , Creating my way to success , Keeing it Simple , The Girl Creative , DIY Showoff , Making the World Cuter  , Under the Table Dreaming , Marvelously Messy , Our Delightful Home , Blackberry Vine , Shwin and Shwin  , Christy's Cuties , Romance on a Dime , Homework , Not Just a Housewife , Vintage Wanna Bee , A Bowl Full of Lemons , DIY By Design  , Raegun Wear , Sarahndipities ,

Featured

 Photobucket

Saturday, June 16, 2012

Tea Party Set {Themed Girl Gift}

We are coming into Birthday season for all of Charlotte's little friends, which, if I'm not paying attention, can cost me QUITE a bit.

We joined this mom group when Charlotte was a baby and the mom group's playdates go by age. Therefore naturally all the kids we because close with are Charlotte's age and have birthdays within 3 months of each other. Yikes! Talk about a busy weekend schedule.

So I was wandering around Targets Clearance aisles a while ago and came across these kids tea party set; how perfect for a 3 year old?


I admit, they were kind of plain all by themselves, but personalize and paint-pen a plastic box


and add some "tea party goodies" and you've got the perfect little (cost effective) gift.


Then all you need to do is lay it out cute and organized...

... like put the silverware in a fun little container ...


 and throw crystal light into the teapot...


 ... and VOILA!

Linking up: Nifty Thrifty Things, Shaken Together, Young and Crafty, Snips and Spice, CRAFT, Creating my way to Success, 

Featured:


Photobucket

Wednesday, June 6, 2012

{Pinned there, Done that} Experiment Night

So a while back I pinned this how-to on making soap clouds over at Out Best Bites. I chose a night when hubby would be working late and decided it would be a great time for a little experiment.

Before: Bar of Ivory Soap
Toss in the (dirty) microwave (on parchment paper or something) for 2 minutes

After: Soap Cloud

We then went immediately to the bath tub where I "made it snow" and the girls lathered themselves with soap. I must say, though, that the water nearly turned white so I turned the water on and rinsed them with fresh water.

Fun times had by all!

Linking up: Finding my way in TX,
Featured:

Photobucket

Thursday, April 19, 2012

Strawberry Shortcake Birthday ::. The Food (and food tags)

I love themes for parties.

I really do!

Christmas Cocktails.

Summer Luau.
This is why, for Charlotte's Strawberry shortcake birthday party, I decided to have some sort of food or beverage to represent each of the characters (um... minus Cherry because, to be honest, she's not in the books that we have, which is what I initially got the party idea from; also I don't think she's like a full-time cast member, lol).

Strawberry Shortcake
Strawberry Shortcake Cups


Orange Blossom's
Orange Wedges


Lemon Meringue's
Lemon Cheesecake Bars


Blueberry Muffin's
Blueberry Muffin Pops (um... not as pops, lol)


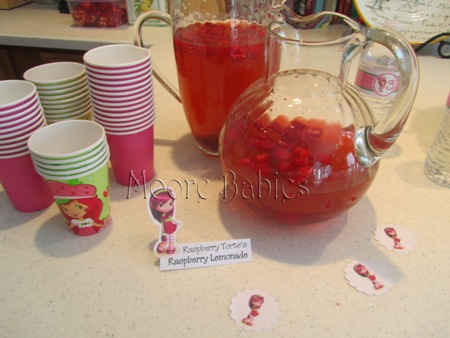
Raspberry Torte's
Raspberry Lemonade


Plum Pudding's
Plum Grape Jello Jigglers
* um... I actually meant to put "Plum Purple Jelloe Jigglers" woops. I did try to find some dessert with plums, but eventually gave up because I didn't want to spend TOO much time on something!


AND for the Food Tags...

So super unbelieveably easy! I googled the strawberry shortcake cartoon characters and came up with images of each of the characters. I then printed them out onto cardstock and glued them to a cardstock tent with the food name on it.

There you go.

In doing my research for putting together this blog post, I tried to find where I downloaded my strawberry shortcake character images from... but I think hubworld.com changed the pictures. If you are interested in what I have, please contact me at themoorebabies(at)gmail(dot)com.

Linking up:
Delightful Order, Just a Little Creativity, Crafty Blog Stalker, Happy Go Lucky, Ladybird Ln, Sun scholars, Naptime Crafters, BacontimeDelicate Construction , I heart naptime,  Nifty Thrifty Things, DIY Showoff, Shaken Together, Lamb Around, CRAFT
Keeping it simple,
Marvelously Messy,
Sarahndipities,
Our Delightful Home,
Elizabeth and Co, Rae Gun Ramblings, Homework, Romance on a Dime, Not just a Housewife,
 DIY by Design, Trophy Wife, Bowl Full of Lemon, Blackberry Vine, Vintage Wanna Bee,
Twin Dragon Fly Designs, Handyman Crafty Woman, Trendy Treehouse, Blue Cricket Design, Sew Much Ado, My Girlish Whims, Momnivores Dilemma, 

Featured:
RomanceOnADime.com
Photobucket

Thursday, April 5, 2012

{DIY} Party Water bottle Labels

We've all seen those super cute personalized water bottles floating around, right? So I decided I was going to do those for Charlotte's 3rd Birthday Party. So off to google (what did we do before google?) and I typed in "DIY water bottle labels" and came up with Life {Sweet} Life's DIY Printable Water Bottle labels.

I then headed over to my favorite, photoshop, to put together a super cute (in my opinion) label for the Strawberry Shortcake birthday party.

Here's how I did it:

I set up my label dimensions to be 1.5" by 8.25"ish (actually, the first time I made them 2" wide.. er... tall, but that was WAY bigger than the water bottle allowed, so I went back and shrunk everything). I created a new doc, changed the right dropdown to "inches" and then made my resolution 300.


Once my document was created, I created a circle of dots (using this photoshop tutorial).

I found a strawberry shortcake image from http://www.hubworld.com/ (Strawberry shortcake is on the Hub channel)

 Added a "3"

 Inserted a green bar across the label


Then added a pink bar just inside the green bar making the green the border.


Put a white circle on top of the pink and green, but under the dots, "3", and strawberry shortcake


Added some text ("Happy Birthday Charlotte *", repeated)


Copied that line 2 more times to fill my pink bar, and set the text slightly askew from the other rows


I also added a SMALL grey line at the very bottom so I could distinguish between the labels when I went to print them so I would know where to cute (see image below)

To print them, I opened a word doc and made my margins as SMALL as they could go (0.12" on all sides). Then I pasted down until I was at the end of my word doc.


I printed my labels out on regular old white paper (no cardstock as  Life {Sweet} Life suggested) and I got like 5 per sheet. I then separated them using my handy dandy paper cutter.

The tip that I walked away from this blog was PACKING TAPE. Forget about using waterproof paper (they have that?) or leaving your printer paper to wrinkle and tear; use the 2in wide packing tape so when you press it on the bottle, you have a tight* seal.

* I used publix water bottles and maybe they were a little flimsy, but I didn't have a TIGHT seal. Once submerged, they bleed... but it was still super cute!


Awesome.

Voila.

This is such a super easy way to personalize your party and tie your theme together.

Linking up: Delightful Order, Bacontime, Sun Scholars, Ladybird Lane, Delicate Construction, Naptime CraftersTatertots and Jello, Young and Crafty, Crafty Moms Share, Marvelously Messy, Creating my Way to Success, Shaken Together,CRAFT, Homework, Not Just a Housewife, Blackberry Vine, Vintage Wanna Bee, Chef in Training, Our Delightful Home, Sew Much Ado, My Girlish Whims, Gingersnap CraftsDragonfly Designs, Trendy Treehouse, Blue Cricket Design, Handyman Crafty Woman, Crafty Blog Stalker,  

Featured:


Photobucket

Saturday, March 17, 2012

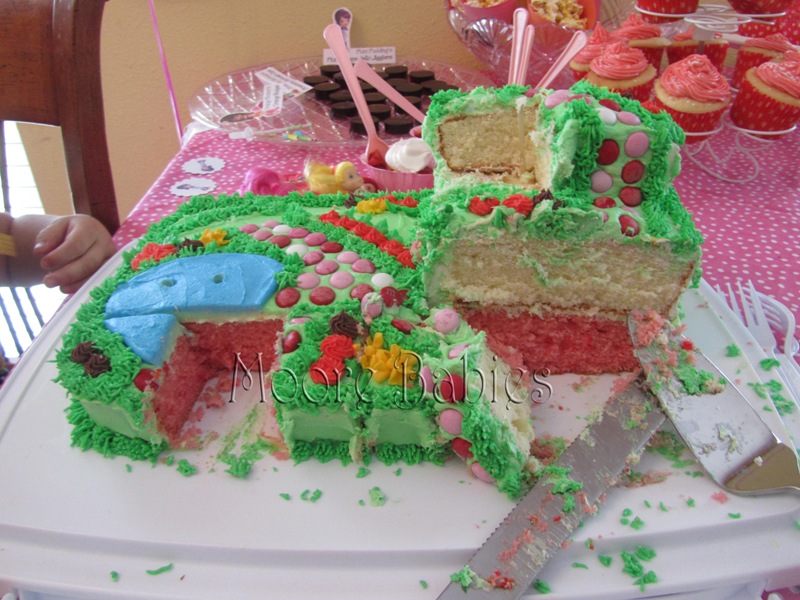
Strawberry Shortcake Birthday ::. The Cake

 In case you missed my guest post over at Between U & Me the other day... here it is!

Strawberry Shortcake Birthday Cake

Ok, I'm not gonna lie... I'm really proud of this cake.

Like, SUPER proud of this cake.

So much so, that I would like to share with you how I did it.

1. Start with a strawberry cake (boxed... which was FANTASTIC!!)

2. Put on a crumb coat using whatever icing you want. I used canned because I didn't feel like making half a dozen batches of icing. This was buttercream.

3. I baked a white 8"x8" cake (plus a dozen cupcakes) because I figured that not everyone would really like strawberry cake. Once cooled, I cut 1/3 off, then cut that 1/3 in half.
4. Put the 3rd layer on (secured with skewers... we should have leveled the cake, but we didn't) and crumb coat and chill.
5. NOW using my Grandma's Wedding Icing recipe, cover the whole cake in green.
6. Smooth the cake using step 4 on Wilton's site (or after googling, this method looks awesome). I also added the icing for the pond...

7. ... then smooth the pond out and added the pathway (PS I used valentine's m&ms)
8. Next came the grass using tip 33. And then I took a break because my hand got sore. Back to the fridge went the cake.

9. Finally, I added in some color with some flowers; I made drop flowers (yellow) with tip 18 I believe and I made rosettes with tip 16.

Now we are ready for PARTY DAY!
I almost couldn't cut into it...

but with 17 3 year olds hovering around begging for cake, I had to give in.

Linking up: Crafty Mom Share, Young & Crafty, Tatertots and Jello, Lolly Jane, Around Tuit, Under the Table Dreaming, Crafts Keep me Sane, CRAFT, The Girl Creative, Delicate Construction, Making the World Cuter, Homework, Not just a Housewife, A Bowl ful of Lemons, Chef in Training, Vintage Wanna Bee, Blackberry Vine, Gluesticks,  Our Delightful Home

Featured:
Our Delightful Home
Photobucket

Link within

Related Posts Plugin for WordPress, Blogger...