Thursday, May 19, 2011

Pizza Night: #4 - Exquisite Pizza Sauce

Pizza Night #4 was made despite the house STILL being a complete disaster area. The home improvement project that was supposed to take a weekend is going on 2 weeks now. Fun huh? Also, the night was going SO well until one of those "I knew better" moments happened... but I'll explain that later. Here's pizza Night #4.

I made the Exquisite Pizza Sauce recipe this time.
Ingredients

1 (6 ounce) can tomato paste
6 fluid ounces warm water (110 degrees F/45 degrees C)
3 tablespoons grated Parmesan cheese
1 teaspoon minced garlic
2 tablespoons honey
1 teaspoon anchovy paste (optional)
3/4 teaspoon onion powder
1/4 teaspoon dried oregano
1/4 teaspoon dried marjoram
1/4 teaspoon dried basil
1/4 teaspoon ground black pepper
1/8 teaspoon cayenne pepper
1/8 teaspoon dried red pepper flakes
salt to taste

Directions
1.In a small bowl, combine tomato paste, water, Parmesan cheese, garlic, honey, anchovy paste, onion powder, oregano, marjoram, basil, ground black pepper, cayenne pepper, red pepper flakes and salt; mix together, breaking up any clumps of cheese.

2.Sauce should sit for 30 minutes to blend flavors; spread over pizza dough and prepare pizza as desired.

To be honest, we much preferred the other week's sauce recipe, so so far, week 2 sauce is the top runner!

I have to announce that hubby seems to be getting better at tossing dough (after some instructions from one of our college friends who worked at the happened pizza night place in college).

So the pizza was prepped and in the oven, the girls were bathed and in their pajamas... we were just getting ready to eat when the "I knew better" moment happened.

I was putting Jillie into her high chair to try to eat a little more when I decided to empty out her pocket bib which was FULL of food. So I turned around and in 10 seconds flat Jillie had leaned forward and flipped out of the high chair onto the tile! No I hadn't strapped her in because I've been using the tray lately, and no... I hadn't put the tray on yet because I messing with the bib. UUUUGH!

Hubby took Jillie to the ER so Charlotte and I spent the next 3 hours sort of eating and sort of watching Anastasia. All I kept saying to myself was stupid stupid stupid.

Jillie got a cat scan and is completely fine! But I sure learned a lesson. One that I shouldn't have needed to learn that way.

Pizza (and movie) Night #4 -- ... kind of a failure!


Movie: Anastasia


I'm still looking for your favorite pizza recipes!
Photobucket

Wednesday, May 18, 2011

1st Giveaway WINNER!

I want to thank everyone for entering my 1st giveaway for a $15 gift certificate to ColonyWear.com! I can't wait to host more giveaways in the future.

According to Random.org #9 is our winner...
Who might that be? Well, I decided to put all the comments into excel (and separate out the commenter's who put multiple replies in one comment :) ) and here is what I got:

CONGRATULATIONS Mairin!
I have will send you an email with all the information; but if I do not hear back from you within 48 hours I will select a new winner.

Thanks again everyone!
Photobucket

Monday, May 16, 2011

Recipe :: Baked Mushroom Chicken

Baked Mushroom Chicken
Ingredients
4 boneless skinless chicken breast halves

¼ cup all-purpose flour
4 tablespoons butter, divided
1 cup sliced fresh mushrooms
½ cup chicken broth
¼ teaspoon salt
1/8 teaspoon pepper
½ cup shredded mozzarella cheese
½ cup grated Parmesan cheese
¼ cup sliced green onions


Flatten each chicken breast half to ¼-inch thickness. 
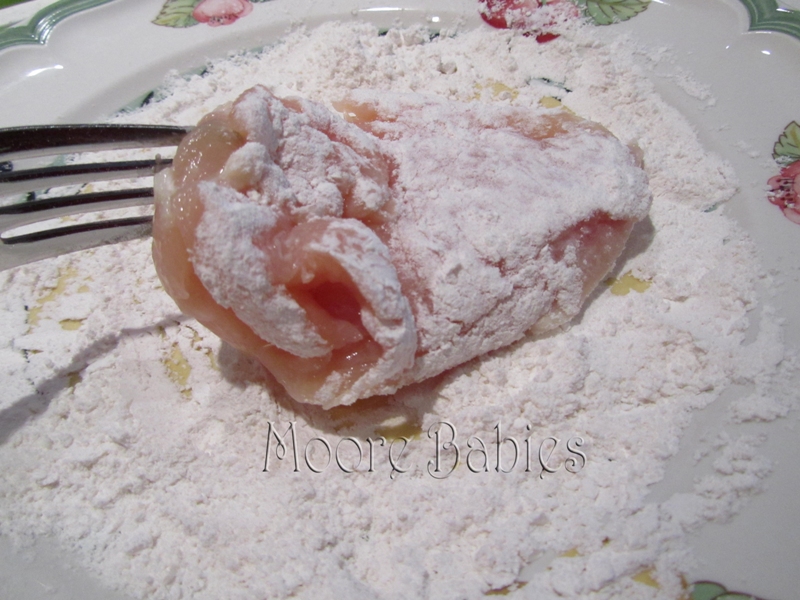
Place flour in a resealable plastic bag; add chicken a few pieces at a time.  Seal and shake to coat.
OR
Dredge in flour (as seen below)

In a large skillet, brown chicken in 2 tablespoons butter on both sides (about 4 minutes per side).
Transfer to a greased 11-inch x 7 inch baking dish. In the same skillet, sauté mushrooms in the remaining butter until slightly tender. Add the broth, salt and pepper.
Bring to a boil; cook for 4 minutes or until liquid is reduced. Spoon over chicken.

* I only used 3 chicken breasts this time
Bake uncovered at 375 degrees for 20 minutes. Sprinkle with the cheeses and green onions.

Bake an additional 5 minutes until cheeses are melted. Serve over noodles. Serves 4.

Enjoy!

Linking up: Sarahndipities, Run with Glitter, Not just a housewife, Blackberry Vine, Sew Much Ado, Sweet Peas and Bumblebees, Gluesticks, It's a Keeper, Fingerprints on the Fridge

Featured:


Photobucket

Sunday, May 15, 2011

Referring sites, Pinterest, Stumbleupon...

I was just scrolling through my Google Reader while I had a few minutes free (that should have been spent doing something useful like laundry, dishes, etc), and I came across Bacon Time With The Hungry Hungry Hypo's latest blog post thanking her followers and referring sites.

I've seen this quite a bit actually; blogs thanking their top 10 referrers for the month.  SO of course, I decided to check mine out. For the past month, it's a landslide... my top referrer with 601 referrals was DollarStoreCrafts, they did a post on my Ribbon and Pearl Necklace tutorial (thanks guys! WAY awesome).

I then hopped over and looked at my referrals for the day (silly I know); and I got DollarStoreCrafts (of course), pinterest (more on this in a second), ChildMade (not entirely sure what this is since when I click it, it redirects to my blog anyway), and a few others. It's fun to see where my readers are coming from!

So I clicked the pinterest link and see someone has "pinned".. or maybe "repinned" my Minnie Mouse Ears tutorial. What is Pinterest? According to the site it is "a place to catalog the things you love". I actually just glanced at someones blog today about Pinterest... apparently I have to look into it more. It looks like a supped-up version of a bookmarking... where you can follow other peoples bookmarks.  For those of you who use it... is that what it is? It is worth it to sign up for ANOTHER site?

The last thing I was checking out was StumbleUpon.com (Bacon Time With The Hungry Hungry Hypo had mentioned it). THIS looks like something that would be worth while to the blog, right? So I sign up, create an account, (sort of) start to stumble, attempt to add my blog (not sure it actually worked)... and then little one woke up and needed food. So I gave up. I did add a little stumble logo to show up after each post if people want to "stumble" my post... hey, I figure every little bit helps! Does anyone else use stumbleupon?

Thoughts? Comments?
Photobucket

Saturday, May 14, 2011

100 follower GIVEAWAY ends SOON!

My 100 follower giveaway ends at midnight on May 15 ET
Here are some more fun items you can spend your $15 gift certificate to Colonywear.com on.

leather flip flops, leather wallet, collegiate sleep shirt/ bathing cover, girls collegiate romper, Bath robes, leather squeaky shoes, scrubs

Go HERE to enter the giveaway; do not enter on this post).


Photobucket

Friday, May 13, 2011

Wilton Cake Decorating: Week #2

My 2nd Wilton Cake Decorating Class was this week and you (may have) read last week that I didn't really learn too much last week, but was hoping to learn a lot this week... well, I set my hopes a little high I guess.

It turns out our instructor doesn't exactly go along with the "Lesson Plan" from our book.
We get to class with our 8 inch un-iced cake and we get started icing the whole cake. She then shows us how to do Piping Gel Pattern Transfer (from lesson 1 in the book), which is absolutely brilliant! Seriously! I actually kind of hate to share this nifty little tidbit (not like it's a secret or anything though). This would have come in handy for the Minnie Mouse cake for Charlotte's 2nd birthday party. The general idea is you print out your pattern, place parchment paper on top, trace the lines using Piping Gel, flip over onto an iced cake and brush over your lines to transfer them. Once you remove the parchment paper, your pattern is on the cake. Voila. Simple. Genius.

We skip the lessons on "Bag Position", "Pressure Control", "Curving Line and Tight Zigzag", and "Dimensional Decorating" and go straight to coloring icing with 'Wilton Icing Color' -- which I know how to do.

Our instructor does come around to each person and show us how to do the specific design and which tip to use. So she came to me for the top of my cupcake design (pictured below) and showed me how to do it and told me to practice on my practice board. That was it. I was done with my decorating rather quickly, so I embellished with some dots on the top, and around the edges of the cake.

Since I was done rather quickly, I decided to go ahead and practice my "Curving Line and Tight Zigzag" since I wasn't entirely sure when we'd do them. I ask my instructor if this was ok and she said 'sure, you'll just have more practice than everyone else'.... so I guess that means we are doing it in Week 3?

By the way, here was my mother-in-laws cake; she likes to "play" versus being precise.

And here is my cake (after the drive home) to sort of show you the dimension of the cupcake:

I know I say that I'm not really "learning" much... but I AM getting 2 hours free to play without the kids... so you can't beat that!!

Next week we are decorating cupcakes with Drop Flowers, Shell borders, Pompom flowers, leaves, shaggy mums, plus learning to fill and ice a cupcake. Looks fun!

Other posts in this series:
Week 1
Week 3
Week 4

Don't forget to enter my 100 followers giveaway! They have some awesome stuff!! It's easy, only 2 mandatory entires :)

Linking up: Nifty Thrifty Things, Little Lucy Lu, CRAFT, Sarahndipities, Run with Glitter, Blackberry Vine, Sew Much Ado, Sweet Peas and Bumblebees, Gluesticks, Fingerprints on the Fridge
Photobucket

Wednesday, May 11, 2011

Product Review :: KidCo Bath Storage Basket

There is thrifty... and there is downright cheap. I fear I am the latter.

I have been meaning to get a basket that goes across the tub for the bath toys for like... a year. But I am so cheap that I HATE to pay shipping, and because of that... I went a year without getting this product. Which is really stupid if you think about it; if you think you need the product, and you have to have it shipped... just do it. I had one when I grew up and we used to spend hours playing in the tub, ahh fond memories, and I wanted one for my girls.

Target has it - but it's "online only".
I actually registered for it when I had Jillie's baby shower, but I didn't get it (Darn!).
Bed Bath and Beyond carries is... but not within 50 miles of me.

So FINALLY, after night after night of leaving toys on the floor of the bath tub or bending down and picking up the toys and putting them in the hanging bag that is up on the shower head (those suction cups just do NOT stick to my tile)... I gave in.

I found the bath storage basket on Amazon for a few dollars cheaper than Target and BBB (woo hoo!) and broke down and bought it. It arrived the otherday (surprisingly quick), and we put it to the test.

The girls LOVED it! Although, Jillie was more fond of chewing on it than anything else. The problem is she is a little too short and I don't have grippies on the tub, so as she is try to pull on the rack to chew on it, her behind slips and she is stuck holding onto the rack for dear life with her legs flailing underneath. I hate to laugh, but it's kind of funny.

KidCo Bath Storage Basket gets an A in my book.

PS - You'll notice the water is green. We still use the color bath dropz (and the Sesame Street ones) every other day or so. It's a game, when I say "Bath time!", Charlotte puts in her request for color and starts shouting out colors, "yellow, blue, purple, blue, red, yellow, green..."


Photobucket

Link within

Related Posts Plugin for WordPress, Blogger...