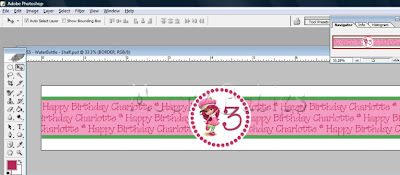
I then headed over to my favorite, photoshop, to put together a super cute (in my opinion) label for the Strawberry Shortcake birthday party.
Here's how I did it:
I set up my label dimensions to be 1.5" by 8.25"ish (actually, the first time I made them 2" wide.. er... tall, but that was WAY bigger than the water bottle allowed, so I went back and shrunk everything). I created a new doc, changed the right dropdown to "inches" and then made my resolution 300.
Once my document was created, I created a circle of dots (using this photoshop tutorial).
I found a strawberry shortcake image from http://www.hubworld.com/ (Strawberry shortcake is on the Hub channel)
Added a "3"
Inserted a green bar across the label
Then added a pink bar just inside the green bar making the green the border.
Put a white circle on top of the pink and green, but under the dots, "3", and strawberry shortcake
Added some text ("Happy Birthday Charlotte *", repeated)
Copied that line 2 more times to fill my pink bar, and set the text slightly askew from the other rows
I also added a SMALL grey line at the very bottom so I could distinguish between the labels when I went to print them so I would know where to cute (see image below)
To print them, I opened a word doc and made my margins as SMALL as they could go (0.12" on all sides). Then I pasted down until I was at the end of my word doc.
I printed my labels out on regular old white paper (no cardstock as Life {Sweet} Life suggested) and I got like 5 per sheet. I then separated them using my handy dandy paper cutter.
The tip that I walked away from this blog was PACKING TAPE. Forget about using waterproof paper (they have that?) or leaving your printer paper to wrinkle and tear; use the 2in wide packing tape so when you press it on the bottle, you have a tight* seal.
* I used publix water bottles and maybe they were a little flimsy, but I didn't have a TIGHT seal. Once submerged, they bleed... but it was still super cute!
Awesome.
Voila.
This is such a super easy way to personalize your party and tie your theme together.
Linking up: Delightful Order, Bacontime, Sun Scholars, Ladybird Lane, Delicate Construction, Naptime Crafters, Tatertots and Jello, Young and Crafty, Crafty Moms Share, Marvelously Messy, Creating my Way to Success, Shaken Together,CRAFT, Homework, Not Just a Housewife, Blackberry Vine, Vintage Wanna Bee, Chef in Training, Our Delightful Home, Sew Much Ado, My Girlish Whims, Gingersnap CraftsDragonfly Designs, Trendy Treehouse, Blue Cricket Design, Handyman Crafty Woman, Crafty Blog Stalker,
Featured:


This is great! Thanks for sharing how you did it! I love anything personalized like this! I'm hopping over from delicate construction and am now following! Love your site over here! I'd love for you to stop by The Vintage Milk House! Happy Easter weekend! - Kali
ReplyDeleteThis is perfect! I love it!! I would love it if you could link it up to Fantabulous Friday going on now!
ReplyDeletehttp://littlebeckyhomecky.blogspot.com/2012/04/fantabulous-friday-7.html
Hope to see you there!
Great instructions! I am looking forward to trying this one day at a party. Thank you for sharing.
ReplyDeleteWhat a cute idea for party bottles! Love it!
ReplyDeleteThanks for linking to a Round Tuit!
Hope you have a fabulous week!
Jill @ Creating my way to Success
http://www.jembellish.blogspot.com/
That's SO great of you to share your photoshop knowledge! It seems so scary!!
ReplyDeleteThis is awesome but I'm confused where you got your shortcake image? I've tried photoshop and my biggest deterrent is finding good images to use! I went to hub.com and it seems like some sort of financial website??
ReplyDeleteI'm so sorry Pamela! Typo... clearly I didn't check my links. I meant:
Deletehttp://www.hubworld.com/
That's the channel that Strawberry Shortcake show is on. I will edit that now.
To find images for my own personal use, I go to google and type in "strawberry shortcake". Once the results come up, I search "images".
What a wonderful idea and great tutorial! Thank you for sharing at Sharing Saturday! I hope you are having a great week!
ReplyDeleteLove this step by step! Saw you liked up over at A Turtle's Life for Me! Great job on these...I think I could make some! :) -Jen
ReplyDeleteThis is a really great project! It will really come in handy with upcoming kid birthday parties. I would love it if you would come link this up at my Pinworthy Projects Link Party.
ReplyDeleteHi Stevie, It's my pleasure to feature this awesome post in my Fabulous Friday Favorites tonight. Thank you for participating & please feel free to take an "I Was Featured" button {if you don't already have one}.
ReplyDeleteWarmly, Michelle
These are great girl!!
ReplyDeleteThese are simply adorable birthday water bottle labels, nice tutorial, thank you.
ReplyDeleteWhat a great idea to share..................Thanks
ReplyDeleteGreat idea to share............Thanks
ReplyDeleteThat is awesome I hadn't thought of it but I like it. I will have to do something like this for my little girl. I think that I will go with Disney princess's. She loves all of the Disney princess's so I think that she will be really excited with it.
ReplyDeleteJason|http://www.nwlabel.com/
Your blogs and each of its stuff is so pleasurable and valuable it is making me come back soon.
ReplyDeleteis bubblegum casting legitimate